Arduino - 高级 I/O 功能
在本章中,我们将学习一些高级输入和输出功能。
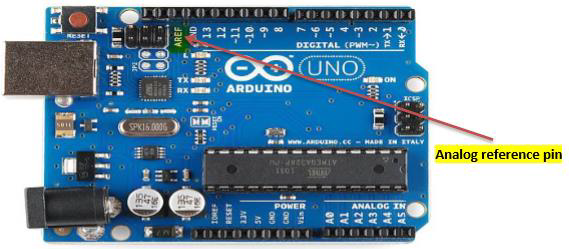
analogReference() 函数
配置用于模拟输入的参考电压(即用作输入范围顶部的值)。选项是 -
-
DEFAULT - 默认模拟参考电压为 5 伏(在 5V Arduino 电路板上)或 3.3 伏电压(在 3.3V Arduino 电路板上)
-
INTERNAL - 内置参考电压,ATmega168 或 ATmega328 等于 1.1 伏,ATmega8 等电压为 2.56 伏(Arduino Mega 不提供)
-
INTERNAL1V1 - 内置 1.1V 基准电压源(仅限 Arduino Mega)
-
INTERNAL2V56 - 内置 2.56V 基准电压源(仅限 Arduino Mega)
-
EXTERNAL - 施加到 AREF 引脚的电压(仅 0 至 5V)用作参考
analogReference() 函数语法
analogReference (type);
type - 可以使用任何类型的跟随(DEFAULT,INTERNAL,INTERNAL1V1,INTERNAL2V56,EXTERNAL)
对于 AREF 引脚上的外部参考电压,请勿使用低于 0V 或高于 5V 的电压。如果在 AREF 引脚上使用外部参考,则必须在调用 analogRead() 函数之前将模拟参考设置为 EXTERNAL。否则,你将短接有效参考电压(内部产生)和 AREF 引脚,可能会损坏 Arduino 板上的微控制器。
或者,你可以通过 5K 电阻将外部参考电压连接到 AREF 引脚,从而可以在外部和内部参考电压之间切换。
请注意,电阻会改变用作参考电压的电压,因为 AREF 引脚上有一个内部 32K 电阻。两者充当分压器。例如,通过电阻施加的 2.5V 将在 AREF 引脚处产生 2.5 * 32 /(32+5)= ~2.2V。
例
int analogPin = 3;// potentiometer wiper (middle terminal) connected to analog pin 3
int val = 0; // variable to store the read value

void setup() {
   Serial.begin(9600); // setup serial
   analogReference(EXTERNAL); // the voltage applied to the AREF pin (0 to 5V only)
      // is used as the reference.
}

void loop() {
   val = analogRead(analogPin); // read the input pin
   Serial.println(val); // debug value
}