Arduino - I2C 通訊
I2C 通訊是用於微控制器和新一代專用積體電路之間的序列資料交換的系統。當它們之間的距離很短時使用它(接收器和發射器通常在同一印刷板上)。通過兩根導線建立連線。一個用於資料傳輸,另一個用於同步(時鐘訊號)。
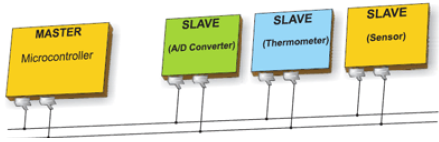
如下圖所示,一個裝置始終是主裝置。它在通訊開始之前執行一個從晶片的定址。這樣,一個微控制器就可以與 112 個不同的裝置通訊。波特率通常為 100 Kb /秒(標準模式)或 10 Kb /秒(慢波特率模式)。最近出現了波特率為 3.4 Mb / sec 的系統。通過 I2C 匯流排通訊的裝置之間的距離限制在幾米。
板上 I2C 引腳
I2C 匯流排由兩個訊號組成 - SCL 和 SDA。SCL 是時鐘訊號,SDA 是資料訊號。當前匯流排主控器始終生成時鐘訊號。某些從裝置有時可能會強制時鐘低電平以延遲主裝置傳送更多資料(或者在主裝置嘗試計時之前需要更多時間來準備資料)。這被稱為“時鐘拉伸”。
以下是不同 Arduino 板的引腳 -
- Uno,Pro Mini - A4(SDA),A5(SCL)
- Due - 20(SDA),21(SCL)
- Leonardo,Cloud 2(SDA),3(SCL)
Arduino I2C
我們有兩種模式 - 主程式碼和從程式碼 - 使用 I2C 連線兩個 Arduino 板。他們是 -
- 主傳送器/從接收器
- 主接收器/從傳送器
主傳送器/從接收器
現在讓我們看看主發射器和從接收器是什麼。
主傳送器
以下函式用於初始化 Wire 庫並將 I2C 匯流排作為主站或從站加入。通常只呼叫一次。
-
Wire.begin(address)- 在我們的例子中,地址是 7 位從地址,因為未指定主裝置,它將作為主裝置加入匯流排。 -
Wire.beginTransmission(address)- 使用給定地址開始傳輸到 I2C 從裝置。 -
Wire.write(value)- 用於從主裝置傳輸到從裝置的佇列位元組(中間呼叫beginTransmission()和endTransmission()。 -
Wire.endTransmission()- 結束由beginTransmission()啟動的從裝置的傳輸,並傳輸由wire.write()排隊的位元組。
例
#include <Wire.h> //include wire library

void setup() //this will run only once {
   Wire.begin(); // join i2c bus as master
}

short age = 0;

void loop() {
   Wire.beginTransmission(2);
   // transmit to device #2
   Wire.write("age is = ");
   Wire.write(age); // sends one byte
   Wire.endTransmission(); // stop transmitting
   delay(1000);
}
從接收器
使用以下函式 -
-
Wire.begin(address)- 地址是 7 位從機地址。 -
Wire.onReceive(received data handler)- 從裝置從主裝置接收資料時要呼叫的函式。 -
Wire.available()- 返回可用Wire.read()檢索的位元組數。這應該在Wire.onReceive()處理程式中呼叫。
例
#include <Wire.h> //include wire library

void setup() {  //this will run only once
   Wire.begin(2); // join i2c bus with address #2
   Wire.onReceive(receiveEvent); // call receiveEvent when the master send any thing
   Serial.begin(9600); // start serial for output to print what we receive
}

void loop() {
   delay(250);
}

//-----this function will execute whenever data is received from master-----//

void receiveEvent(int howMany) {
   while (Wire.available()>1) // loop through all but the last {
      char c = Wire.read(); // receive byte as a character
      Serial.print(c); // print the character
   }
}
主接收器/從傳送器
現在讓我們看看什麼是主接收器和從發射器。
主接收器
主機被程式設計為請求,然後讀取從唯一定址的 Slave Arduino 傳送的資料位元組。
使用以下函式 -
Wire.requestFrom(address, number of bytes) - 主裝置用於從從裝置請求位元組。然後可以使用函式 wire.available() 和 wire.read() 函式檢索位元組。
例
#include <Wire.h> //include wire library void setup() {
   Wire.begin(); // join i2c bus (address optional for master)
   Serial.begin(9600); // start serial for output
}

void loop() {
   Wire.requestFrom(2, 1); // request 1 bytes from slave device #2
   while (Wire.available()) // slave may send less than requested {
      char c = Wire.read(); // receive a byte as character
      Serial.print(c); // print the character
   }
   delay(500);
}
從傳送器
使用以下函式。
Wire.onRequest(handler) - 當主裝置從此從裝置請求資料時,將呼叫該函式。
例
#include <Wire.h>

void setup() {
   Wire.begin(2); // join i2c bus with address #2
   Wire.onRequest(requestEvent); // register event
}

Byte x = 0;

void loop() {
   delay(100);
}

// function that executes whenever data is requested by master
// this function is registered as an event, see setup()

void requestEvent() {
   Wire.write(x); // respond with message of 1 bytes as expected by master
   x++;
}